[Deprecated] SwiftUI as UI for SpriteKit games
31-10-2019 Filed in: Swift | Experiments
Update 2020-06-23: in Xcode 12, Apple introduced a native solution for integrating SpriteKit and SwiftUI. Learn more here: https://www.hackingwithswift.com/quick-start/swiftui/how-to-integrate-spritekit-using-spriteview
———— Original post follows ————
For my HexMap project, I use SwiftUI to create the game's GUI.
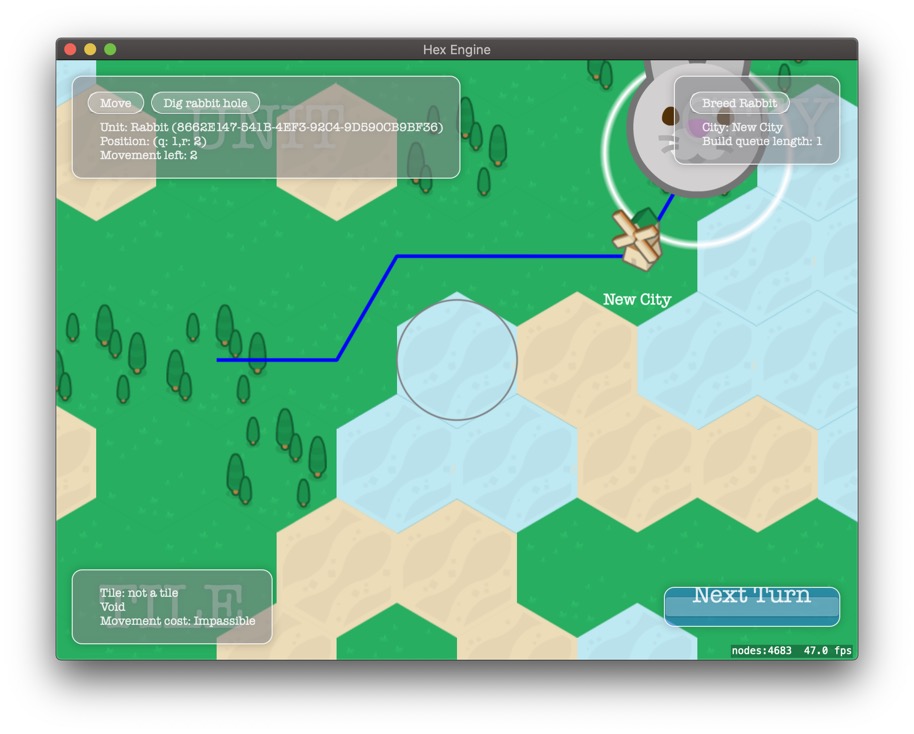
In this tutorial, I'll show (with a simpler) example how I integrate SwiftUI and SpriteKit.
———— Original post follows ————
For my HexMap project, I use SwiftUI to create the game's GUI.
In this tutorial, I'll show (with a simpler) example how I integrate SwiftUI and SpriteKit.
Why use SwiftUI with SpriteKit?
But first, why would you want to do this?
Consider the UI for a turn based strategy game. What the UI shows is very much dependent on the state of the game:
- your current technologies determine the buildings in the list you choose your build queue from,
- whether they are enabled depends on the resources you have,
- when you "buy" for an improvement, your "money" should be decreased immediately.
Also, you probably need "lists" and "rows of buttons", all spaced out nicely. SwiftUI has very simple solutions for these kind of UI elements, that take a lot of effort to implement otherwise.
So, it can be a good idea to combine SwiftUI and SpriteKit. How do you do this?
There are actually two approaches:
- The SpriteKit view (
SKView) is embedded as a View in SwiftUI; - The SwiftUI view is a separate view, overlaying the SpriteKit view.
Here, I demonstrate the second approach. Mainly, because it's a lot simpler. And it allows you to swap out the SwiftUI GUI for something else if you so choose.
Example project
For this tutorial, we'll add a simple UI to the "Stacker" example game you can find on GitHub. We'll use SwiftUI to implement two UI features:
- Show the total height of the stack
- A "pause menu"
First, download the example project from GitHub: https://github.com/maartene/Stacker
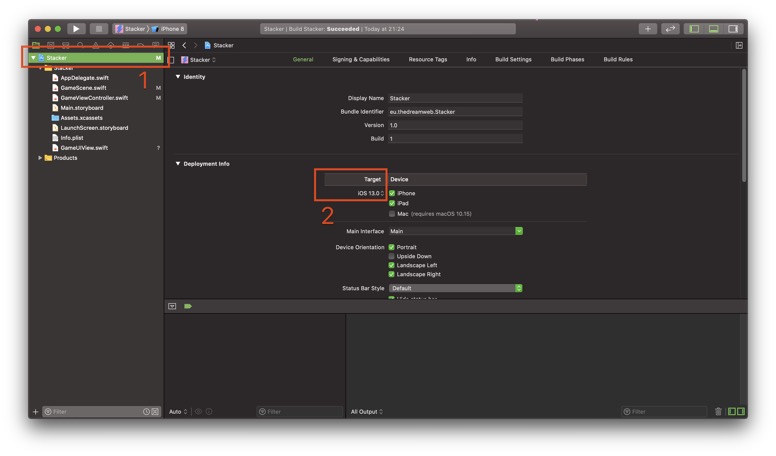
This project was created for iOS 12.4. To use SwiftUI, it needs to target iOS 13.0 (or higher). Start by setting the target in the project settings:
Step 1: creating and displaying the SwiftUI view
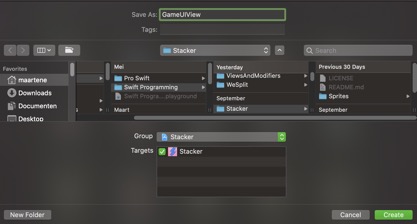
Start by creating a new "SwiftUI View" file in the project (File -> New -> SwiftUI View) and call it "GameUIView".

For now, leave the new
GameUIView.swift file as is.Then, go to
GameViewController.swift and add SwiftUI to the imports:import UIKit
import SpriteKit
import GameplayKit
import SwiftUIFinally add the following to
override func viewDidLoad() right below the if let view = self.view as! SKView? { line:// 1. create an instance of the SwiftUI view we just added to the project
let gameUI = GameUIView()
// 2. embed this view into a ViewController
let uiController = UIHostingController(rootView: gameUI)
// 3. add the uiController as a child ViewController to this one
addChild(uiController)
// 4. set the SwiftUI view controller's frame to be the same size as the SpriteKit view
uiController.view.frame = view.frame
// 5. set the background color to transparant, otherwise the SwiftUI view contains the standard white background, obscuring the SpriteKit view
uiController.view.backgroundColor = UIColor.clear
// 6. add the SwiftUI view as a subview to the SpriteKit view
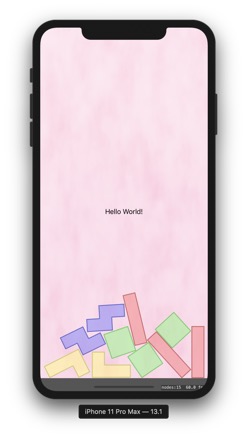
view.addSubview(uiController.view)Build and run the app, and you will see the default SwiftUI "Hello, World" view on top of the SpriteKit game. Congrats, because this is 90% of the integration done!
Step 2: how high is your stack?
Let's add a text view showing the maximum height of our stack.
Step 2a: preparing the data
First, we need our GameScene (that holds all game logic for this simple game) to be able to determine the stacks maximum height.
Open
GameScene.swiftStart by adding SwiftUI to the list of imports. Then add protocol
ObservableObject to the class:import SpriteKit
import GameplayKit
import SwiftUI
class GameScene: SKScene, ObservableObject {Below line
var spawnedBlocks = [SKSpriteNode]()// this property will be observed by SwiftUI view for changes to show the maximum tower height.
@Published var maxTowerHeight: Double = 0This creates a property holding the height of the stack. Adding the
@Published modifier let's SwiftUI know that we want to be notified when this property changes. Perfect!Now, this property needs to be filled with data. Go down to the
override func update(_ currentTime: TimeInterval) method and at the bottom of the function, add the following code:// calculate towerHeight, (not very accurate)
for block in spawnedBlocks {
// we only count blocks that are not moving (i.e. resting), don't mind the nil coalescence here
// we set the maxTowerHeight to the y-position of a resting block if it's higher than the current maxTowerHeight
// this is not perfect: it measures from the midpoint of the block and doesn't take shape into account.
// typecasting is required here.
if (block.physicsBody?.isResting ?? false) && Double(block.position.y) > maxTowerHeight {
maxTowerHeight = Double(block.position.y)
}
}This method simply updates the maximum height of the tower each turn. Although not perfect, it's good enough for demonstration purposes.
Let's show this value in SwiftUI!
Step 2b: Showing the data
Open
GameUIView.swift and add the following property:@ObservedObject var gameScene: GameSceneNow, your code will no longer compile. Both the Preview and
GameScene.swift will complain. Fix these first.In
GameUIView.swift, changestruct GameUIView_Previews: PreviewProvider {
static var previews: some View {
GameUIView()
}
}to:
struct GameUIView_Previews: PreviewProvider {
    static var previews: some View {
        GameUIView(gameScene: GameScene())
    }
}
And in
GameViewController.swift, change line:let gameUI = GameUIView()let gameUI = GameUIView(gameScene: scene)Finally, in
GameUIView.swift, change line:Text("Hello, World!")Text("Tower height: \(gameScene.maxTowerHeight)").font(.largeTitle)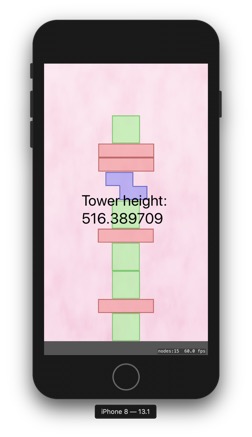
I know, won't win any beauty awards, but at least getting data from the game to SwiftUI is working. And it updates automatically, without that much code!
Step 3: Pause menu
Implementing a pauze menu is not that much more difficult. Here goes!
First, go back to
GameScene.swift, because we need another property (add it right after maxTowerHeight:// we'll use this property as a "wrapper" for the existing SKScene.isPaused property so we can make it published. We'll also sync it's value to the actual isPaused property so we immediately get pausing behaviour.
@Published var gameIsPaused = false {
didSet {
isPaused = gameIsPaused
}
}Second, let's create a
restart() function that resets the game state. Add this at the end of the GameScene class:// restart the game
func restart() {
// 1: remove the blocks from the scene
removeChildren(in: spawnedBlocks)
// 2: remove the blocks from the spawnedBlocks array
// this triggers their cleanup
// they will be replaced as per the Update function
spawnedBlocks.removeAll()
// 3: reset the tower height
maxTowerHeight = 0
}From a logic point of view, these are all the changes we need.
In
GameUIView.swift, we can use this property to:- Determine whether the game is paused and the pause menu should be shown;
- Change the value of this property based on what the player chooses.
Note: you can format the view as you see fit. This is a quick and dirty example for demonstration purposes only. Please note the commented lines as these show the integration between the GameScene (SpriteKit) and GameUIView (SwiftUI):
var body: some View {
ZStack {
// The if statement determines what is shown in the view: either the pause menu
// or a "Pause" symbol and the maximum tower height.
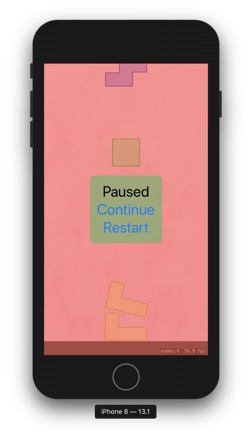
if gameScene.gameIsPaused {
Color.red.opacity(0.5)
VStack {
VStack {
Text("Paused")
Button("Continue") {
// when the continue button is pressed, we unpause the game
self.gameScene.gameIsPaused = false
}
Button("Restart") {
// when the restart button is pressed, we call the GameScene's restart function and unpause the game.
self.gameScene.restart()
self.gameScene.gameIsPaused = false
}
}.font(.largeTitle)
.padding()
.background(Color.green.opacity(0.5))
.clipShape(RoundedRectangle(cornerRadius: CGFloat(10)))
}.transition(.slide)
} else {
// this part of the view is shown when the game is not paused
VStack {
HStack {
Spacer()
// This shows a "pause" button, and pauses the game when clicked.
Button(action: { self.gameScene.gameIsPaused = true }) {
Text("⏸").font(.largeTitle).padding()
}
}
// this shows the tower height
Text("Tower height: \(gameScene.maxTowerHeight)").font(.largeTitle)
Spacer()
}.transition(.slide)
}
}
}Build and run the game. You will see you can now pause and unpause the game and restart the game from the pause menu.
And that's all there is to integrating SpriteKit and SwiftUI!
Key take-aways
- Yes, you can use SwiftUI as a UI for a SpriteKit game;
- It's easy to connect game state to SwiftUI, both for showing as well as changing state;
- Use
UIHostingController/NSHostingControllerto overlay or embed a SwiftUI view in a SpriteKit app. Note: on macOS, you can also useNSHostingView*.
* See this code as an example (from within a
viewDidLoad function within a ViewController):let gui = GameUIView()
let guiView = NSHostingView(rootView: gui)
guiView.frame = view.frame
view.addSubview(guiView)Note that you don't need to set transparency in this case.